

Free Printable Sewing Patterns: Easter Wall Hanging

![]()
I really love Easter and spring-time! It’s such a great time of year when I can just look out my window and see all the spring bulbs blooming. So I just had to cut a bouquet of narcissus for this photo of my Easter wall hanging.
I designed this wall hanging as an easy hand sewing project so that anyone, even beginners or kids, could give it a try. So I hope everyone will have fun sewing their own wall hanging just in time for Easter. Just look below for the free sewing pattern and instructions.

![]()

![]()
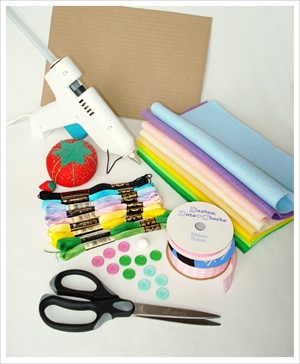
- Felt: green (3 shades), light yellow and dark yellow, cream, light pink, purple, light blue.
- Embroidery thread: light and dark yellow, green, light blue, turquoise, purple, light pink, black.
- Buttons: light blue, green, pink (1/2″ wide, 4 of each).
- Ribbon – 2 pieces: (3/8″ wide, 10” long) (7/8″ wide, 14″ long)
- White pom pom: 1/2″ wide
- Cardboard
- Hot glue gun
- Needle and scissors
- Sewing pattern


Begin by printing out the sewing pattern. Cut out the large square, and trace this onto light blue, green, and pink felt. Then cut out the smaller square from the template and trace this onto purple, light blue, and yellow felt. The smaller squares will be stitched onto the larger squares using the running stitch around the edge. Use a color of embroidery thread that matches the inner square, or a color of your choice.
The small purple square goes on the light blue square, the small light blue square goes on the green square, and the small yellow square goes on the pink square.
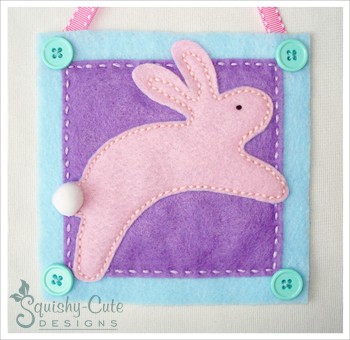
Let’s now start with the top square (light blue and purple). Cut out the bunny pattern and trace this onto light pink felt. Cut out the bunny and place it where you would like in the square. Then begin to sew the bunny down using the backstitch in pink floss around the border of the bunny.
You can then give your bunny an eye using a French knot in black thread. You could also use a black seed bead if you would rather. Now to complete the look, hot glue the white pom pom over the bunny’s tail.
Finally, stitch a light blue button in each of the bottom corners of the light blue square. Before you stitch on the top two however, you will need to sew on the ends of the 10″ piece of ribbon. This will form a loop of ribbon for your banner to hang by once it is finished. Once the ribbon is in place, you can sew the other two buttons down. Now your first square is complete! See the photo for details.
![]()

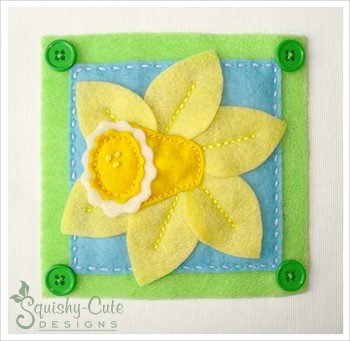
Next will be the green and light blue square. For this one, cut out all the pattern pieces for the daffodil. Cut out 6 of the petals in light yellow felt. Cut out one trumpet in dark yellow felt. Cut out one large wavy oval in cream colored felt, and one small wavy oval in the dark yellow felt.
Now arrange the 6 petals around the center of the square. Sew each petal down using the backstitch down the center. Then place the trumpet over the hole in the center of the petals. Stitch this down with a backstitch around the border. Next, place the large cream colored oval over the end of the trumpet. Then place the smaller oval in the center of the larger. These will be stitched down together using a backstitch around the border of the smaller oval. Complete the look by sewing 3 yellow French knots in the center of the trumpet. Again, you could also use seed beads instead.
As with the previous square, sew a button (green for this square) in each of the corners. Of course for this square you don’t need to worry about sewing a ribbon on first. Now you are done! See the photo for details.

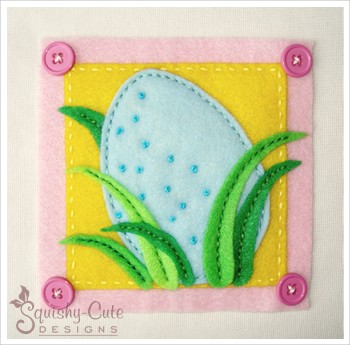
For the final square, cut out the egg and grass blade patterns. Cut out the egg in light blue felt, and the grass blades in various shades of green. Place the egg at a slight tilt in the center of the square. Before you sew the egg down, be sure to place the tip of the grass blade behind the egg (see photo for reference). Sew this (top most) blade of grass down using a backstitch down the center. Then begin to sew the egg down using the backstitch all around the border.
Next, arrange the grass blades as you would like in front of the egg. Each blade is sewn down with a backstitch down the center. Then, to make the egg look speckled, we added many French knots in turquoise thread all over the egg. Seed beads could be used as well.
After sewing a pink button in each corner as in the previous steps, your final square is now done! See the photo for details.

Now that you are done embroidering all three squares, your Easter embroidery wall hanging is almost done! Before it is done however, you must support the back of each square with cardboard. Cut out three squares of cardboard that are about 4-3/4″ by 4-3/4″. To glue each square down, place a glob of hot glue behind each of the buttons in the four corners so the glue doesn’t show through the felt. You may want to glue one corner at a time so the glue doesn’t harden and you can pull the felt nice and taut for each corner.

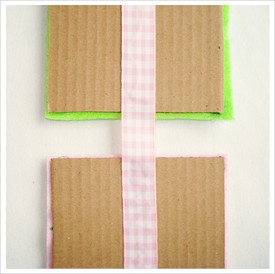
To connect all three squares, you will now glue a wide ribbon, about 14″ long, down the center of the cardboard on the back of each square using hot glue. Of course before you do so, be sure to arrange the squares how you want them and have them evenly spaced. We spaced ours about 1″ between each square. See the adjacent photo for how this should look.
You are now done with your felt Easter wall hanging!
![]()
![]()
You may also like….
Felt Garden Banner

Felt Photo Album
Flag Wall Hanging
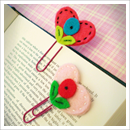
Felt Heart Bookmarks
![]()
We hope you like this easy home decor sewing pattern for Easter! And be sure to check out our other free printable sewing patterns shown above. Thanks so much for stopping by, and Happy Easter & Spring everyone!
![]()
![]()
Return to Free Printable Sewing Patterns
Return to Home Page