

How To Do The Satin Stitch
![]()
![]()
![]()
![]()
![]()

![]()

The satin stitch is often stitched over an outline stitch, such as the backstitch, or some other line stitch. This helps to keep the edges of the satin stitch within the parameters of the design. However, the satin stitch can also be done without an outline stitch. Just be sure to cover the drawn lines of your design with each stitch and keep your stitches even with the edge. So begin by either simply drawing the outline of your design onto your fabric, or by also stitching around it with a line stitch.
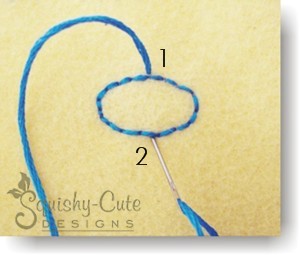
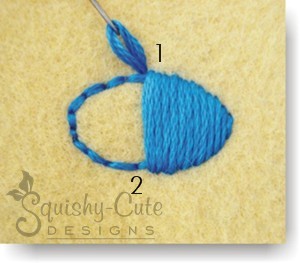
To start the satin stitch, bring your needle up from the back at #1 in the photo below. Then send your needle back down (directly across from #1) at #2. If you are stitching over an outline stitch, make your stitches on the outside of the outline, so that it will be covered when you are finished. Satin stitches should not be too long, or they may sag, gap, or pull out of shape. It is best to keep your satin stitches under one inch long. It’s also a good idea to start in the middle of the design and work towards each end. This will help to reduce the chance that your stitches will start to slant by the time you get all the way across the design. And it will also help to keep the fabric from distorting.

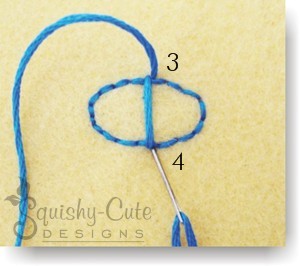
Now bring your needle up at #3 in the photo below and back down again at #4. Keep your stitches straight, parallel and very close together. The stitches should be snug together but not crowded or overlapping each other. As you make each stitch, be sure to keep the floss strands smooth and flat and not twisted. To help relieve any twists in your floss, occasionally dangle your needle and let it unwind. Also it’s important to keep an even tension and not pull your stitches too tight, or your fabric will pucker.

Continue making parallel stitches as you did in step 2 until you reach the end of the design.
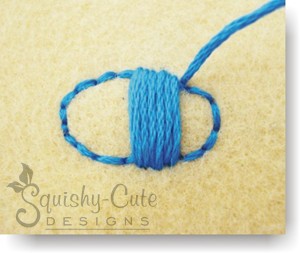

After you have completed the first half of your design, start over again in the center at #1 in the photo below and begin stitching the other side in the same way.
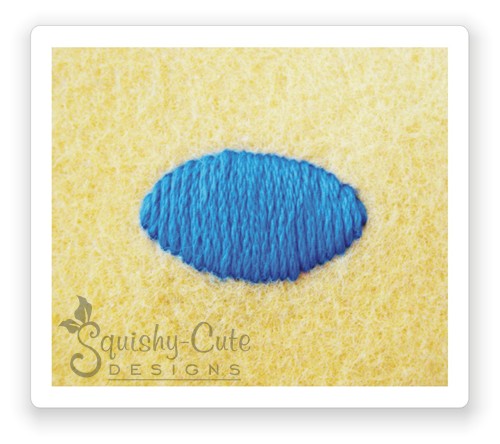
The satin stitch, also called the damask stitch, is one of the most common filling stitches. It is a series of straight, flat stitches used to completely fill in small areas with solid color.
Return to Helpful Hints from Satin Stitch
Return to Home Page