

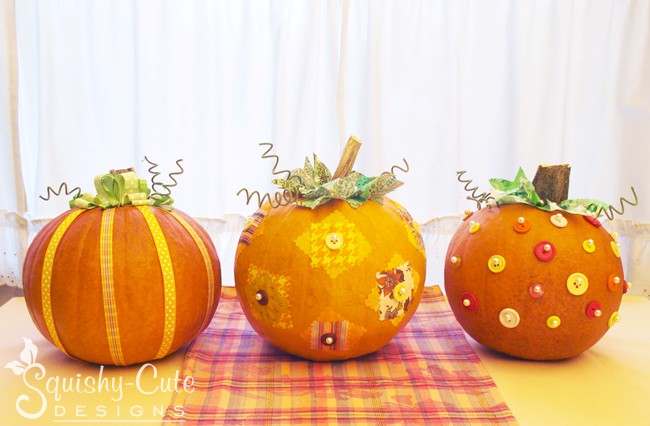
Whimsical Pumpkin Centerpieces
Turn ordinary pumpkins into whimsical pumpkin centerpieces! These adorable pumpkins would make a fun decoration for Thanksgiving or for autumn weddings.
![]()
![]()
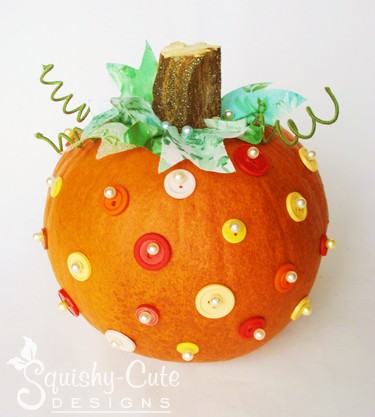
I really love decorating for the different seasons and autumn is definitely my favorite. I came up with this pumpkin centerpiece idea to decorate our Thanksgiving table, but they could also be used to decorate for an autumn wedding! This is a fun and fairly simple project to make, and the pumpkins turn out very cute and whimsical. I made three different styles using ribbons, buttons and fabric. Below, you will find my step-by-step instructions for each of the pumpkins that I made. I really had fun making these and hope you will too!

![]()
General Supplies For All Three Pumpkins

• Small to medium pumpkins
• Pearl head pins
• Spools of orange & green ribbon
• Green floral wire
• Wire cutters
• Scissors
• Buttons
• Scraps of green & orange fabric
• Glue
• Brush
• Pinking shears (optional)
![]()
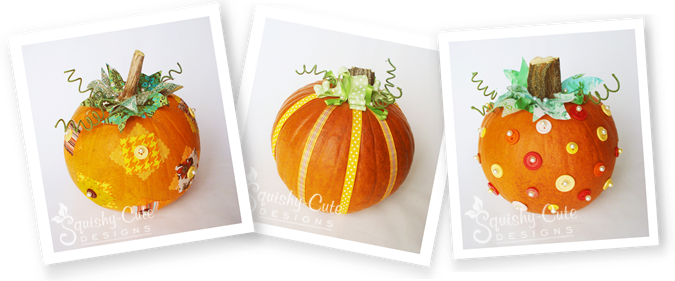
Ribbon Pumpkin Centerpieces

Supplies
• Small to medium pumpkin
• Pearl head pins (8 – 10)
• Orange ribbon (2+ spools)
• Green ribbon (2+ spools)
• Green floral wire
• Wire cutters
• Scissors

Measure and cut enough pieces of orange ribbon so that they are evenly spaced around your pumpkin. To do this, start the end of your ribbon at the stem and then wrap it under the pumpkin to the opposite side of the stem, and cut the ribbon. Use as many different orange ribbon patterns as you like. We used two patterns, polka dots and plaid.

Measure and cut your green ribbon in 7″ to 8″ lengths depending on the size of your pumpkin. Cut 5 to 6 pieces. Use as many different green patterns as you like. We used two patterns of this as well, polka dots and solid green.

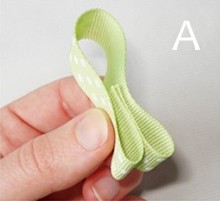
To get the green ribbon ready to go onto your pumpkin, take the two ends of the ribbon and fold them in about 1″ on each end. Then fold the ribbon in half. See photo A to see what this should look like.
![]()
![]()
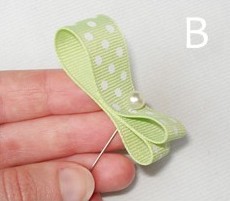
Now stick a pin through the green ribbon. It should be stuck through the middle of the two folded ends. See photo B.
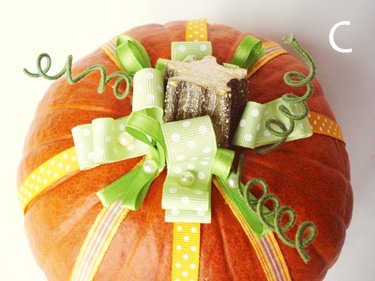

Place the end of one of the orange ribbons at the base of the stem. Now take your green folded ribbon (with the pin already stuck through it) and pin down through the end of the orange ribbon. The orange and green ribbons will be anchored together on the pumpkin with the one pin. Now take the loose end of the orange ribbon and wrap it under the pumpkin and up to the opposite side of the stem. Then anchor it and another piece of green folded ribbon in the same way. Continue doing this all around the pumpkin. See photo C.
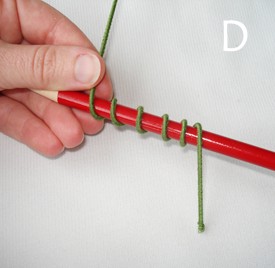

Now take the green wire and wrap a section of it around a pencil. Leave at least 1.5″ on the end of the wire straight, so you will have a portion to stick into the pumpkin. When you have curled a section that you think is long enough, take the pencil out and cut the rest of the wire off using the wire cutters. See photo D. Make three of these, and then stick the straight end of each into the top of the pumpkin.
Your Ribbon Pumpkin is now finished!
![]()
Button Pumpkin Centerpieces
Supplies
• Small to medium pumpkin
• 25-30 buttons in fall colors
• Scraps of green fabric
• Pearl head pins (about 40)
• Green floral wire
• Wire cutters
• Scissors
This first step is really simple, you just evenly pin buttons all around the pumpkin. Use one pin per button.
Print and cut out the Leaf Template. Use the size leaves that best fit your pumpkin. Trace and cut out the leaf pattern on as many different green fabric designs as you like. We used two different designs.
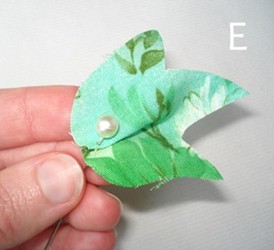
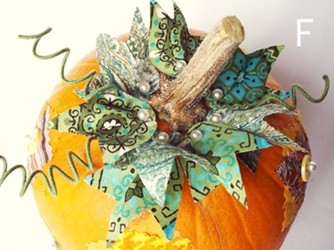
Now fold the base of the leaf over a little and stick a pin through the folded fabric. See photo E. Stick the leaf at the base of the pumpkin’s stem. Continue sticking leaves all around the stem. See photo F.
Same as Step 5 above, under the Ribbon Pumpkin instructions.
Your Button Pumpkin is now finished!
![]()
Patchwork Pumpkin Centerpieces
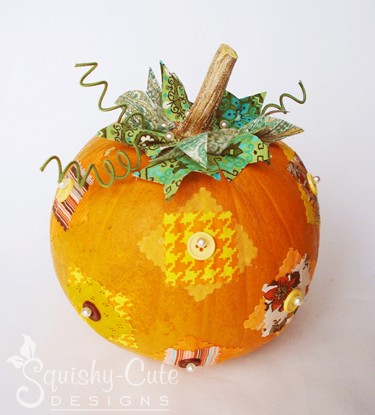
• Small to medium pumpkin
• Buttons (about 12-15)
• Pearl head pins (about 25)
• Scraps of fabric (green, orange, gold, yellow)
• Green floral wire
• Wire cutters
• Elmer’s glue
• Paint brush
• Scissors
• Pinking shears (optional)
Cut fabric into two sizes of squares. Use as many colors and designs as you want. We used different shades and designs of orange, gold, brown and yellow. Cut the fabric into about 1.5″ and 2″ squares. This may vary a little depending on how large your pumpkin is. Cut the fabric using pinking shears if you have them. This gives the edge a cute zig-zag design.
Next, brush on Elmer’s glue to the back of one of your larger fabric squares and then press it down smoothly onto your pumpkin. Now glue a smaller square onto the larger square at an angle. Continue gluing on fabric squares until your pumpkin is nicely covered in a patchwork of fabric.
Now pin a button to the center of each square.
Now follow Steps 2 and 3 above, under the Button Pumpkin instructions, and then Step 5 above, under the Ribbon Pumpkin instructions.
Your Patchwork Pumpkin is now finished!
![]()
![]()
![]()
![]()
You may also like….
Thanksgiving Craft:
Indian Corn Treats
Thanksgiving Coloring Pages

Hydrangea Bouquet Centerpiece
How To Emboss Stamps
![]()
We hope you like this easy home decor idea for pumpkin centerpieces, and that you’ll enjoy making them for your Thanksgiving table. And for all the autumn brides out there, we hope this idea could be helpful for decorating your wedding!
![]()
Return to Free Craft Projects from Pumpkin Centerpieces
Return to Home Page